5 Steps for Organizing your Kitchen for a Home Business (Part 1)
If you’re like most folks starting a cottage food business, you already know your way around a kitchen. It may very well be your favorite spot in the house, where you bake up your holiday cookie favorites or Sunday morning muffins.
The key next step is how to shift from being a homespun casual cook to viewing your kitchen as the base for a viable business enterprise. It’s like your kitchen now has dual personalities. On one side, it’s still the hub of your family meals and routines. On the flip side, it transforms into an efficient production facility where you pump out your pickles and pound cake like nobody’s business.
This is a two-part blog covering the first three of five steps in organizing your kitchen. Early next month, we’ll cover the last two steps.
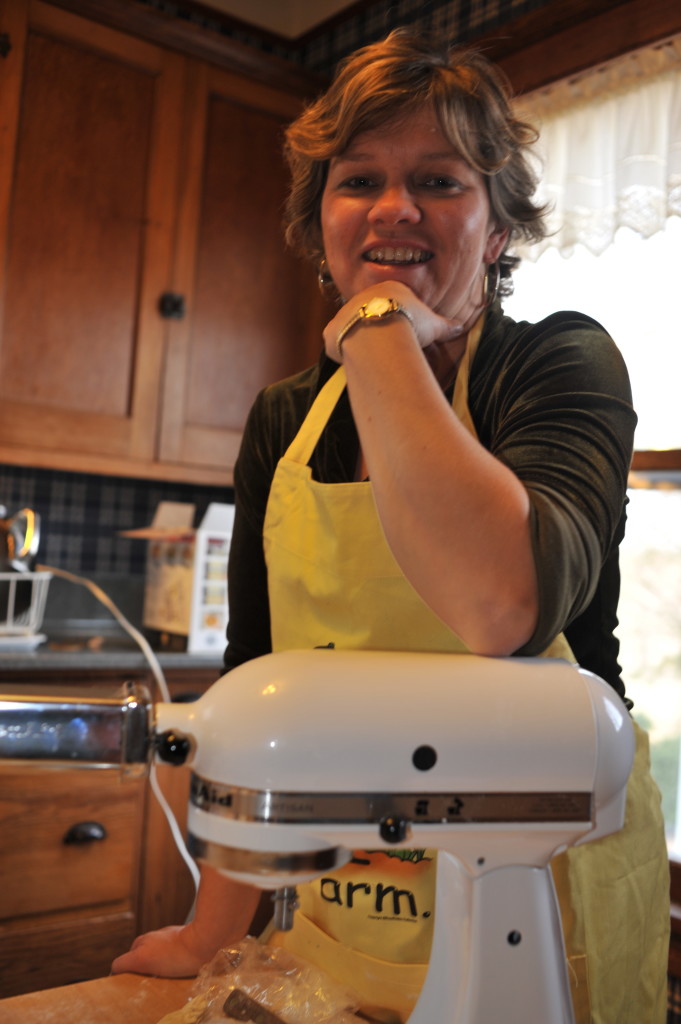
Step 1: Assess Equipment
Set up your kitchen so you can make ten dozen brownies as easily as one dozen. As much as you can, separate personal use from business use; in some states, this is required by law. There will be overlap in your kitchen, particularly as it relates to use of space, from counters to mixers. Covered in detail in HOMEMADE FOR SALE are equipment like stand mixers, baking pans and cooking racks for baked goods and water bath canning tools and procedures for canning food products.
The magic of a cottage food business is that you don’t need to buy a lot of new equipment. However, items that are clearly business-only, such as product ingredients, need to be stored, labeled clearly and tracked separately.
Related to equipment, of course, you already have a refrigerator. Now you need to sort out how to handle the increased storage needs your enterprise will bring. Be sure to cover, date and label all ingredients used in your items. Go for square food storage containers since they use space more efficiently than round ones. Required by many cottage food regulations, place a thermometer designed for refrigerators in the back of your unit and make sure your unit maintains a temperature between 38 and 44 degrees Fahrenheit (3 to 7 degrees Celsius).
Depending on what you’re making and your available space, you may need a second refrigerator. This second unit, used exclusively for the business, could be a capital business expense. It will both give you extra space and avoid confusion with your home items and what the kids know they can snack on. A second refrigerator will also minimize food odor issues, which could jeopardize the taste of your products. Home refrigerators may hold a range of items and the smells they bring with them, like a spicy curry, garlicky potatoes or a fish dish. A second refrigerator stops such smells influencing the flavor of your dough or frosted cake.
Step 2: Inventory Ingredients
Since you’re doing larger batches than you typically would for home use, you’ll need to take managing your ingredients up a notch. “Make do” or substitutes in a recipe are out. Having everything on hand before you start is essential.
To get a handle on your ingredients, list everything you need for your recipes and their approximate quantities. As you scale up in quantity, consider converting your recipes to weight measurements. Changing “cups” to “ounces and pounds” makes calculating total amounts easier. Use a calibrated scale for weighing quantities.
Should you purchase larger quantities in a bulk bag, you’ll need your own storage containers and a system to keep track of your ingredients and make sure they’re fresh. Heavy-duty, food-grade plastic bins can be found at the Container Store and restaurant supply stores. This one-time investment ensures that your ingredients remain fresh and safe while in storage.
Whether your ingredients are refrigerated, like milk or butter, or stored in the pantry, like chocolate chips, use the “first food in, first food out” inventory principle; use the oldest ingredient first to keep inventory fresh. If an item doesn’t have an easy-to-read expiration or “purchase by” date, write the date you purchased it directly on the package with a Sharpie permanent marker. Make sure everything is sealed and covered when stored. If you store items in glass jars, mark dates on the glass with the Sharpie. When the jars are empty, use rubbing alcohol to remove the permanent marker notations.
Some cottage food laws require that ingredients you use for your business be separated somehow from those used in your home for personal consumption. For refrigerated items, CFOs often dedicate a shelf to work ingredients. For dry ingredients, bins, cabinet shelves and racks may be set aside for business-use-only ingredients.
Step 3: Organize the Kitchen
Organization improves your operation on many levels: efficiency; cleanliness; ease of use; food safety. Take the following actions to organize and streamline your production.
Clear clutter
You can never have enough workspace, so move out anything non-essential, especially anything decorative. Create as large and clear a workspace as you can. Potted plants, antiques, collectibles and that random cookie jar need to go. Kitchen space may be limited, so pack up seasonal items like the Thanksgiving turkey roaster or summertime ice pop molds and store them far away. You probably have some dishes taking space in your cabinets that are only used intermittently or for larger dinner parties. Again, find space somewhere else.
Designate cabinets specifically for business inventory
This separation of cabinets gives clear distinction between your personal kitchen and cottage food business and may enable you to calculate and manage your expenses more clearly. If you just dip into your home inventory for ingredients, how will you figure out how much money you are making? Focus on high-volume dry goods that you use for your business, like flour and sugar for baking, and keep those separate. That teaspoon of salt or cinnamon might not matter so much to your bottom line, but some ingredients, like vanilla extract and saffron, are expensive. If your recipes regularly call for high-cost ingredients, keep a separate set of these for business use only. Always keep cleaning supplies stored separately and away from food products.
Add storage space
Any under-utilized spots in your kitchen? Can you add shelves? Chrome wire shelving racks can hold up to 500 pounds. Mount some sturdy stainless steel S hooks on them to hang your large pots or bulky utensils. Likewise, add hooks to the inside of your pantry door to hang lighter items like kitchen towels or a strainer.
Keep your key supplies where you can access them readily and you’ll reduce your preparation time. Consider adding a lazy Susan spinning turntable inside cabinets that holds items like spices and flavorings for easy access. If your cabinet runs deep, consider adding pull-out shelving so you don’t always have to reach into the back and fumble around looking for items.
Don’t forget, you may need storage space for your final product, depending on what it is. Canned items are easiest since they’re shelf-stable and can go anywhere in the house that is cool and dark, like on basement shelving. Most baked goods not yet packaged can go in large food-grade containers, then be stacked. Items made close to the time of sale can be placed directly from the cooling rack to bakery boxes or bags for transport.